On the PC the KeyVR interface consists of two windows:
- The mirror rendering (right)
- The desktop UI (left)
Mirror Rendering
In the Mirror rendering you can follow what the user wearing the HMD (Head Mounted Display) sees.
In the bottom of the UI you can choose to hide/attach/detach the mirror view from the UI. You can also go into full screen in which case the mirror view will fill the screen. Press ESC to exit full-screen.
Desktop UI
Main Menu
- File menu:
- Open BIP/KSP file.
- Preferences:
- Gives access to settings for the desktop UI
- Enables you to adjust the the level of the reduction applied to the field of view to prevent dizziness in Fly mode.
- Enables you to adjust the text size in VR. This will impact Object info and Labels in the grid views. You will need to relaunch the scene for the changes to be applied.
- Exit KeyVR.
- Help Menu:
- Report problem: If you experience crashes or bugs you can let Luxion know here.
- Deactivate license: if you need to use KeyVR on another computer, you can deactivate the license here.
- Manual: Link to manual.
- Log: Access to error/warning log.
- Statistics: Access to runtime statistics of render engine.
- About: Info about the current version of KeyVR.
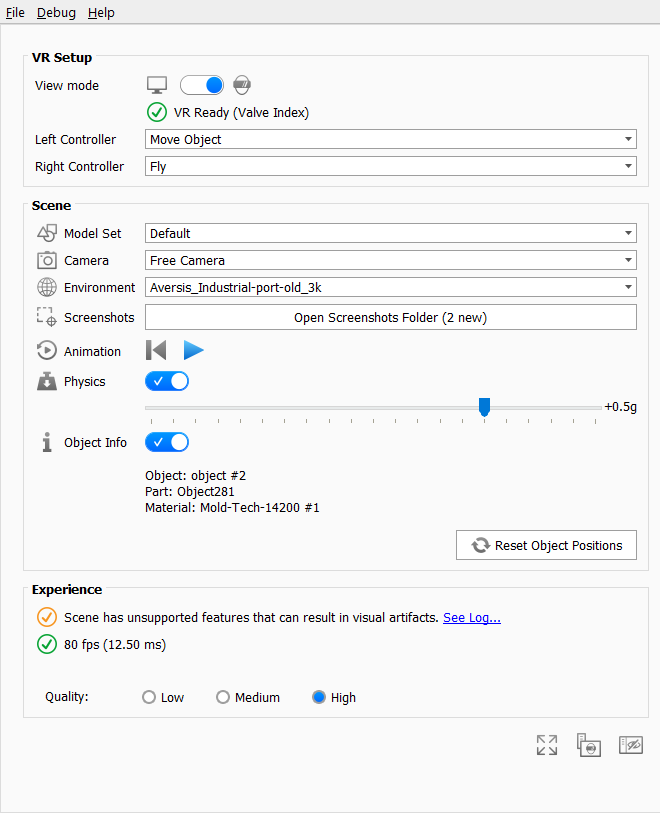
VR Setup
This section gives you information about the state of the HMD and controllers. It also enables you to set the mode for each controller to help or guide the user in VR.
- View mode: Here you can choose between Desktop and VR viewing mode. If the HMD is connected it will default to the VR mode, where the mirror window shows what the user sees in VR. If you switch to Desktop mode, you can control the camera in the mirror window with the same mouse controls as in KeyShot:
- Tumble: Left mouse button drag
- Pan: Middle mouse button drag (Hotkey: Ctrl+Shift+Left mouse button)
- Dolly: Scroll wheel (Hotkey: Alt+Right mouse button)
- Left/Right controller: Here you can choose the current mode for each controller and if needed switch modes. The various modes are described in the section about the VR Interface.
Scene
Here you can select what content, environment and viewing positions is used in the scene - just as you can inside VR via the controller menu. This also enables you to guide the user in VR.
- Model Set: This enables you to control which Model Set is currently shown in the scene.
- Camera: All cameras in the BIP file can be selected via this drop-down list. A click will transport the HMD to that location.
- Environment: All environments in the BIP file can be selected via this drop-down list. A click will change environment.
- Screenshot: During the KeyVR experience you can take screenshots of what you see, these will be stored in the default images folder on your PC.
- Animation: If the BIP file contains animation the animation can be started/paused and reset to start.
- Physics: Start or stop the scene physics. Every object from the BIP file is interpreted as a separate rigid physical object that can be manipulated with VR controllers in "Move Object" mode. With physics on you can experience the scene with gravity and object collision. When physics are turned off, objects will stay in the exact position where you release them when they are moved.
- The gravity slider enables you to adjust the level of gravity.
- Object info: when enabled, properties of the object, that the controller is pointing at, will be shown, both in the desktop UI and in VR.
- Reset Object Positions: This will reset the object positions and animation to the default values.
Experience
Here you can see the frame rate of the current KeyVR experience. For the best experience the frame rate should always be equal to (or above) the refresh rate of the HMD (typically 90hz). If the frame rate is below that, consider setting the graphics quality lower, or reducing number of polygons.
- Quality: The quality is by default set to high. Depending on scene complexity and GPU hardware you may experience low frame rates, in this case you can decrease quality to Medium or Low in order to keep a sufficient frame rate.